nick forrer
Game development and Lisp related posts
Roguelike tutorial for Common Lisp - Part 7 - Creating the interface
This tutorial series is based on the Python Roguelike Tutorial. This will be covering Part 7 of that tutorial.
In this part, we will be working on the UI for the game. This will include a nicer looking health bar, displaying the game messages on screen rather than in the REPL, and showing entity information when hovering over a tile with your mouse cursor.
The health bar
First, lets work on showing a prettier health bar. Right now we are just displaying text for the current health of the player. Instead, we will render a “progress bar” that will fill and deplete based on the player’s health. Before we get into creating this bar, I’d first like to create the concept of a “panel”. This will be a subsection of the screen where various UI elements can be grouped together, and rendered with a border to show the separation from the game map itself.
First, update the map height to give some more space for the UI to be displayed:
(defparameter *map-height* 43)
Next, create a new file “ui.lisp” to hold the panel implementation, along with the additional UI elements we’ll be creating. Define the “panel” class, which will hold it’s position on screen, it’s width and height, along with a list of the components that should be rendered within. This will include the health bar once we create it, as well as the message log.
(in-package :cl-rltut.ui)

(defclass panel ()
  ((x :initarg :x :accessor panel/x)
   (y :initarg :y :accessor panel/y)
   (width :initarg :width :accessor panel/width)
   (height :initarg :height :accessor panel/height)
   (components :initarg :components :accessor panel/components :initform nil)))

(defmethod print-object ((object panel) stream)
  (print-unreadable-object (object stream :type t)
    (with-slots (x y width height) object
      (format stream "(~A,~A) ~Ax~A" x y width height))))

(defun make-panel (x y width height)
  (make-instance 'panel
                 :x x :y y :width width :height height))
We’ll create a base class for UI components that will be rendered within a panel. It will hold a reference to it’s parent panel, and it’s position within the panel:
(defclass panel-component ()
  ((panel :initarg :panel :accessor panel-component/panel)
   (x :initarg :x :accessor panel-component/x)
   (y :initarg :y :accessor panel-component/y)))
Now we can create the “bar” class, which we will keep generic enough to be used for more than just health, such as mana or stamina. The bar will have a “name”, which will be the text rendered within the bar, the width of the bar, the current value and maximum value, and the colors to use while rendering. It will also include “value-bind” and “max-bind” slots. These will be functions that can be called to update the value and maximum values each frame. When a “bar” is created using the “make-bar” function, it will also add it to it’s parent panel’s list of components.
(defclass bar (panel-component)
  ((name :initarg :name :accessor bar/name)
   (total-width :initarg :total-width :accessor bar/total-width)
   (value :initarg :value :accessor bar/value)
   (value-bind :initarg :value-bind)
   (maximum :initarg :maximum :accessor bar/maximum)
   (max-bind :initarg :max-bind)
   (color :initarg :color :accessor bar/color)
   (bg-color :initarg :bg-color :accessor bar/bg-color)))

(defmethod print-object ((object bar) stream)
  (print-unreadable-object (object stream :type t)
    (with-slots (name total-width value maximum) object
      (format stream "~A ~Aw ~A/~A" name total-width value maximum))))

(defun make-bar (name panel x y total-width value color bg-color &key (value-bind nil) (max-bind nil))
  "Create an instance of the `bar` class, and add it to it's parent panels list of components."
  (let ((bar (make-instance 'bar :name name :panel panel
                                 :x x :y y :total-width total-width
                                 :value value :maximum value
                                 :value-bind value-bind :max-bind max-bind
                                 :color color :bg-color bg-color)))
    (setf (panel/components panel) (append (panel/components panel) (list bar)))))
Now that we have the classes created, we can work on rendering the UI to the screen. All of the UI components will implement a “render” method that will handle rendering it within the panel. For the health bar, we’ll render a box for the background that is the full width of the bar, followed by another bar over the top of the background whose width is calculated by the percentage of health the player has. We’ll also render the text for the player’s health within the bar.
(defgeneric render (component))

(defmethod render ((bar bar))
  (with-slots (name panel x y total-width value value-bind maximum max-bind color bg-color) bar
    (when value-bind
      (setf value (funcall value-bind)))
    (when max-bind
      (setf maximum (funcall max-bind)))
    (let ((x-pos (+ (panel/x panel) x))
          (y-pos (+ (panel/y panel) y))
          (fill-width (round (* (/ value maximum) total-width)))
          (content (format nil "~A: ~A/~A" name value maximum)))
      (blt:draw-box x-pos y-pos total-width 1 :background-color bg-color :border nil)
      (unless (zerop value)
        (setf fill-width (max 1 fill-width))
        (blt:draw-box x-pos y-pos fill-width 1 :background-color color :border nil))
      (setf (blt:color) (blt:rgba 255 255 255))
      (blt:draw-box x-pos (1- y-pos) total-width 2 :background-color nil :border nil
                                                   :contents content))))
The render method for each component will be called by it’s parent panel’s “render-panel” method:
(defmethod render-panel ((panel panel))
  (with-slots (x y width height components) panel
      (blt:draw-box x y width height)
      (dolist (component components)
        (render component))))
Back in the main function, we will actually create the panel that will hold these UI components, as well as the health bar. The “value-bind” and “max-bind” slots on the health bar will be assigned to the methods to retrieve the player’s hp and max-hp slots. The stats instance will then be passed into the “game-tick” method.
|
|
The “game-tick” function needs to be updated to include the stats panel as a parameter, and pass it into the “render-all” function:
|
|
Finally, the “render-all” function will take the panel in as a parameter, and then call the “render-panel” method to render the panel and all it’s components. The previous code to render the health can be removed:
|
|
Now, if you run the game, you should see a health bar rendered towards the
bottom of the screen, and it should update when the player gets damaged:

The message log
Now we’ll work on displaying the message log on the screen, rather than just in the REPL. We’ll begin by defining the “message-log” class which will hold a list of messages along with it’s width and height. The “message” class will hold the message text, as well as the message color, so that different messages can be displayed with different colors.
(defclass message-log (panel-component)
  ((messages :initarg :messages :accessor message-log/messages :initform nil)
   (width :initarg :width :accessor message-log/width)
   (height :initarg :height :accessor message-log/height)))

(defclass message ()
  ((text :initarg :text :accessor message/text)
   (color :initarg :color :accessor message/color)))

(defun make-message-log (panel x y width height)
  (let ((log (make-instance 'message-log :panel panel :x x :y y :width width :height height)))
    (setf (panel/components panel) (append (panel/components panel) (list log)))
    log))
We will also want a method to add a message to the message log. This will add a message to the message-log “messages” list, and will also take care of removing old messages when the messages will overflow the height of the message log. We’ll also handle “word-wrapping” when messages are adding that exceed the width of the message log.
(defun word-wrap (full-line width)
  (do ((lines nil)
       (line full-line))
      ((zerop (length line)) lines)
    (cond ((< (length line) width)
           (setf lines (append lines (list line))
                 line nil))
           (t
            (setf lines (append lines (list (subseq line 0 width)))
                  line (subseq line width))))))

(defgeneric add-message (log message &key color))
(defmethod add-message ((log message-log) message &key (color (blt:rgba 255 255 255)))
  (with-slots (messages width height) log
    (let ((wrapped-text (word-wrap message width)))
      (dolist (text wrapped-text)
        (setf messages (append messages (list (make-instance 'message :text text :color color))))
        (when (>= (length messages) (1- height))
          (setf messages (rest messages)))))))
Now, to implement the “render” method for the message log, we’ll just loop over all of the messages, and render them line-by-line:
(defmethod render ((log message-log))
  (let ((x (+ (panel-component/x log) (panel/x (panel-component/panel log))))
        (y (+ (panel-component/y log) (panel/y (panel-component/panel log)))))
    (dolist (message (message-log/messages log))
      (setf (blt:color) (message/color message))
      (blt:print x y (message/text message))
      (incf y))))
Now, back in the main function, we can create the message log, and add an initial message.
|
|
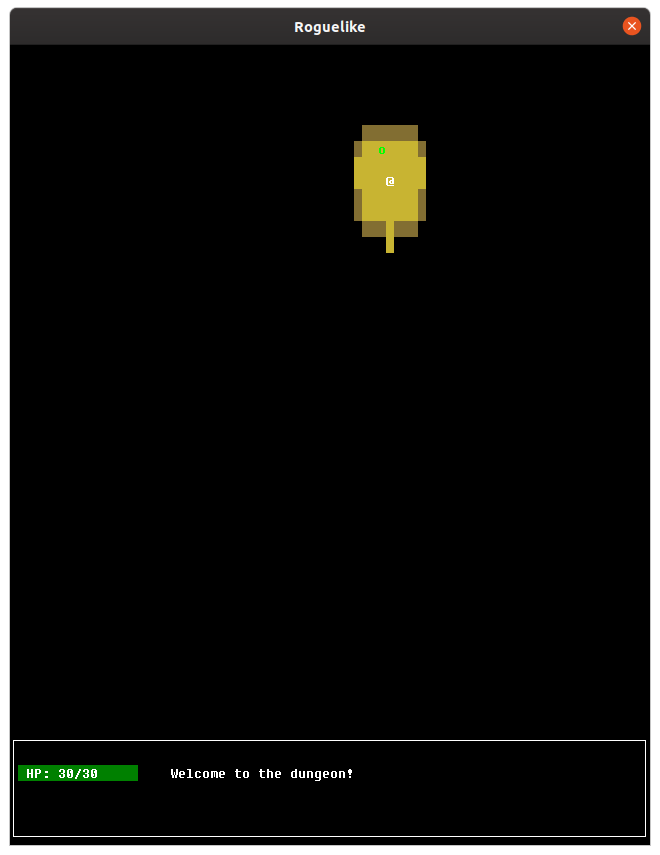
If you run the game now, you should see that initial message displayed on
screen:

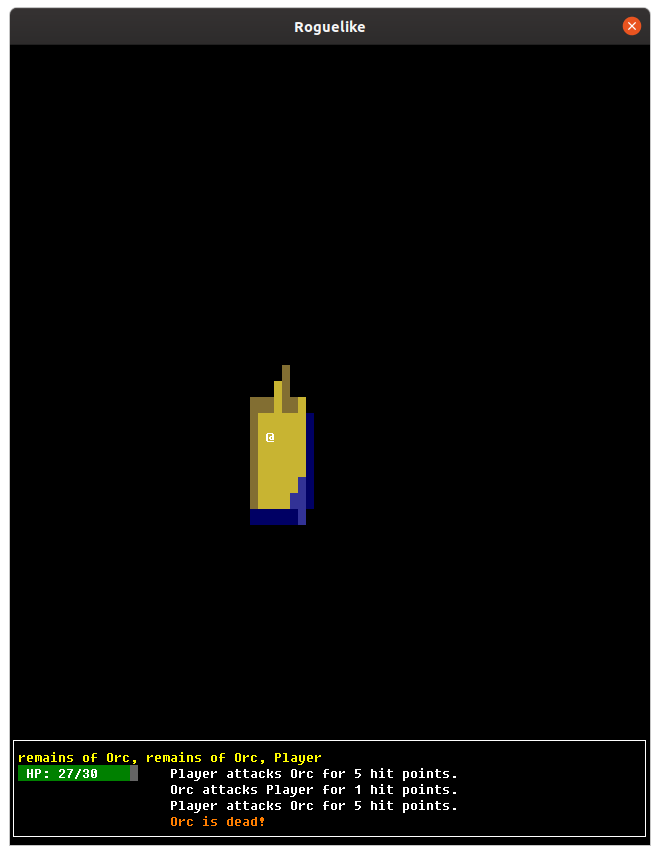
To have the remaining messages displayed in the log, replace the “format”
function calls with “add-message” calls in the game-tick function. Once done,
you will see the message log fill up with messages:

Entities under cursor
The final change we’ll make is to incorporate mouse movement into the UI. When the mouse cursor is over a tile, we’ll display the list of all entity names to the player. This will make it easier for player’s to learn which entities are which once there are more than two in the game.
The first change is to configure BearLibTerminal to track mouse movement events:
|
|
Now, in “rendering.lisp” we’ll need a function to retrieve a list of all entity names under the mouse cursor. This will first check to make sure the tile is visible by the player. Then, it’ll loop over the list of entities, and for any entities at the mouse cursor position, it will append the entity name to the “names” list. Then, to join all of the names to a string separated by a comma, we’ll use the “format” method, with the “{}” descriptor to iterate over the names, and the “^” descriptor to only include the comma when it’s not the last name in the list.
(defun get-names-under-mouse (x y entities map)
  (when (and (< y (game-map/h map))
             (< x (game-map/w map)))
    (let ((names nil)
          (in-fov (tile/visible (aref (game-map/tiles map) x y))))
      (when in-fov
        (dolist (entity entities)
          (when (and (= (entity/x entity) x)
                     (= (entity/y entity) y))
            (setf names (append names (list (entity/name entity)))))))
      (format nil "~{~A~^, ~}" names))))
Finally, update the “render-all” function to call this method, and render the names to the screen.
(let ((entity-names (get-names-under-mouse (blt:mouse-x) (blt:mouse-y) entities map)))
(when entity-names
    (setf (blt:color) (blt:yellow))
    (blt:print (1+ (panel/x stats-panel)) (1+ (panel/y stats-panel)) entity-names)))
Now when you run the game and hover your mouse over an entity, it will display
their names to the screen:

Conclusion
These were some changes to improve the user experience by making the UI nicer to look at, and more informative.
You can find the current state of the code on Github. The list of changes since the previous tutorial can be found at https://github.com/nwforrer/cl-rltut/compare/part-6...part-7-1.
If you run into any issues, or have questions/feedback, please open an issue on this blogs GitHub repository.
Continue to part 8.