nick forrer
Game development and Lisp related posts
Roguelike tutorial for Common Lisp - Part 4 - Field of view
This tutorial series is based on the Python Roguelike Tutorial. This will be covering Part 4 of that tutorial.
In this post, we’ll be computing the Field Of View (FOV) of the player. This will make exploring the dungeon much more interesting. When the game starts, only the tiles near the player will be visible. As the player explores the dungeon, the tiles that the player moves past will also become visible, allowing the map to be shown. However, any items or enemies will only be visible if they are within the players sight at a given time. Once the player moves on, the item/enemy will no longer be displayed.
This post will differ from the Python Roguelike Tutorial more-so than previous posts. In the Python Tutorial, the libtcod library is being used, which provides FOV algorithms to calculate the FOV for you. However, we’re using BearLibTerminal which does not have such algorithms. We could import the libtcod library to take advantage of those algorithms, but where’s the fun in that? Instead we’ll be writing the algorithm from scratch. The reference I’m using for this is: http://www.roguebasin.com/index.php?title=Line_of_Sight_-_Tobias_Downer. RogueBasin has many articles and techniques for calculating the FOV. We’ll be taking a very simplistic approach, which will work well enough for our needs.
Calculating the Field of View
First, we’ll need a way to track which tiles are visible to the player, so that we can render them differently from the non-visible tiles:
(defclass tile ()
  ((blocked :initarg :blocked
            :accessor tile/blocked
            :initform nil)
   (block-sight :initarg :block-sight
                :accessor tile/block-sight
                :initform nil)
   (visible :initarg :visible
            :accessor tile/visible
            :initform nil)))
The way the algorithm works, is we’ll start at the player’s position, trace rays in every direction, and check each tile that the ray intersects with. If the tile’s block-sight slot is set to nil, then we’ll set it’s visible slot to t. Once a ray reaches a tile that has block-site set to t, then we stop tracing that ray, so all the tiles after it have their visible tiles set to nil.
Create a new file named fov.lisp, and create a fov function, and a way to reset the visible slot on all tiles:
(defparameter *fov-distance* 5)

(defun reset-visibility (map)
  (map-tiles-loop (map tile)
    (setf (tile/visible tile) nil)))

(defun fov (map x y)
  (reset-visibility map))
Now, we’ll trace 360 lines around the player’s position, one for each degree of a circle. Each line will be `fov-distance` long. We will use linear interpolation to take incremential steps over the line. At each step, we’ll check that we haven’t gone outside the bounds of the map, and then check if the tile at that step has block-sight set to t. If neither of those are true, then the tile must be visible. The full function looks like this:
(defun degree-to-radian (degree)
  (* degree (/ pi 180)))

(defun diagonal-distance (x0 y0 x1 y1)
  (let ((dx (- x0 x1))
        (dy (- y1 y0)))
    (max (abs dx) (abs dy))))

(defun lerp (start end time)
  (+ start (* time (- end start))))

(defun fov (map x y)
  (reset-visibility map)

  ;; loop aver 360 degrees
  (dotimes (degree 360)
    (let* ((rad (degree-to-radian degree))
           (nx (round (+ (* (cos rad) *fov-distance*) x)))
           (ny (round (+ (* (sin rad) *fov-distance*) y)))
           (d (diagonal-distance x y nx ny)))
      (dotimes (tile d)
        (let ((tx (round (lerp x nx (/ tile d))))
              (ty (round (lerp y ny (/ tile d)))))
          (if (or (< tx 0) (> tx (game-map/w map)))
              (return))
          (if (or (< ty 0) (> ty (game-map/h map)))
              (return))

          ;; if tile is a wall, mark as seen and stop the line early
          (when (tile/block-sight (aref (game-map/tiles map) tx ty))
            (setf (tile/visible (aref (game-map/tiles map) tx ty)) t)
            (return))

          (setf (tile/visible (aref (game-map/tiles map) tx ty)) t))))))
Rendering the field of view
Now that we know which tiles are visible to the player, we can update our rendering to display them differently. Update the color map to include the colors we’ll use to display the visible floors and walls:
(defparameter *color-map* (list :dark-wall (blt:rgba 0 0 100)
                                :dark-ground (blt:rgba 50 50 150)
                                :light-wall (blt:rgba 130 110 50)
                                :light-ground (blt:rgba 200 180 50)))
Now we can update the render-all function to change the tile colors depending on whether the tile is visible or not:
(defun render-all (entities map)
  (blt:clear)
  (dotimes (y *map-height*)
    (dotimes (x *map-width*)
      (let* ((tile (aref (game-map/tiles map) x y))
             (wall (tile/block-sight tile))
             (visible (tile/visible tile)))
        (if visible
            (if wall
                (setf (blt:background-color) (getf *color-map* :light-wall))
                (setf (blt:background-color) (getf *color-map* :light-ground)))
            (if wall
                (setf (blt:background-color) (getf *color-map* :dark-wall))
                (setf (blt:background-color) (getf *color-map* :dark-ground)))))))
  (mapc #'(lambda (entity) (draw entity map)) entities)
  (setf (blt:background-color) (blt:black))
  (blt:refresh))
Now if you run the game, you should see something like this:
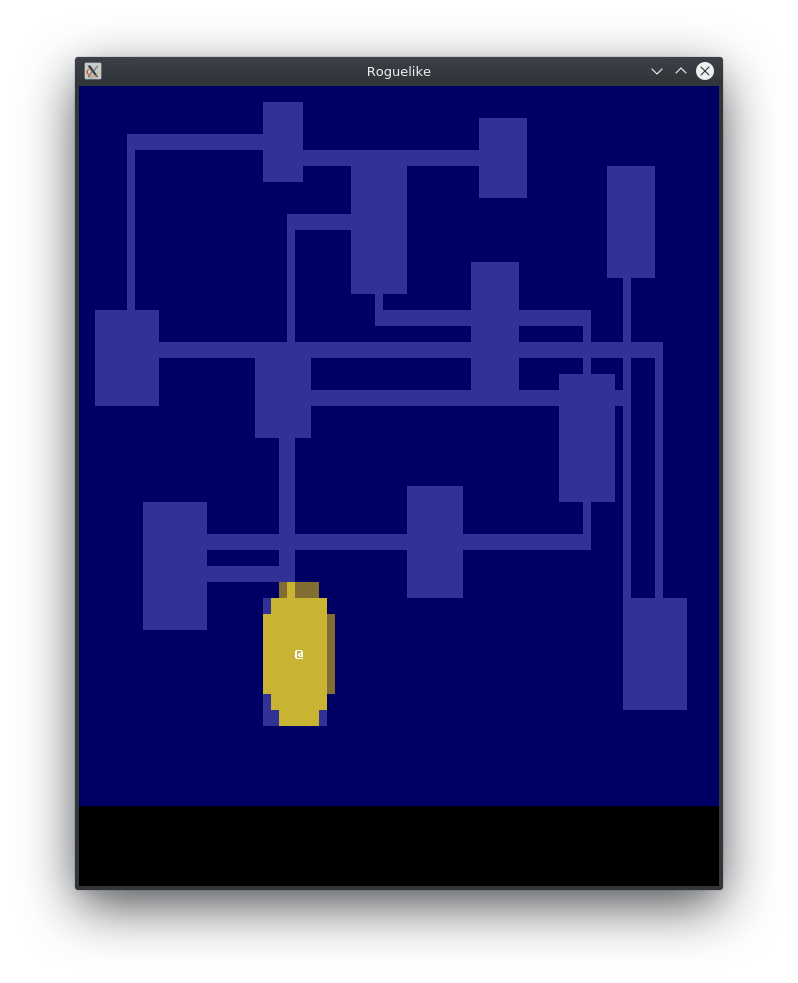
Exploration
One issue with how this works is the entire map is visible to the player at the start. We’d rather hide the map, and only start to display it as the player explores. To do that, we’ll add another tile slot to track which tiles have been explored, and then mark that `t` whenever the tile becomes visible. The difference between `explored` and `visible` is that once `explored` is set to t, it will not be reset.
(defclass tile ()
  ((blocked :initarg :blocked
            :accessor tile/blocked
            :initform nil)
   (block-sight :initarg :block-sight
                :accessor tile/block-sight
                :initform nil)
   (visible :initarg :visible
            :accessor tile/visible
            :initform nil)
   (explored :initarg :explored
             :accessor tile/explored
             :initform nil)))
Now in the fov function, whenever the visible slot is set to true, also set the explored slot to t:
(when (tile/block-sight (aref (game-map/tiles map) tx ty))
  (setf (tile/visible (aref (game-map/tiles map) tx ty)) t
        (tile/explored (aref (game-map/tiles map) tx ty)) t)
  (return))

(setf (tile/visible (aref (game-map/tiles map) tx ty)) t
      (tile/explored (aref (game-map/tiles map) tx ty)) t)
With that data being tracked, we can update the renderer to only show visible or explored tiles.
(defun render-all (entities map)
  (blt:clear)
  (dotimes (y *map-height*)
    (dotimes (x *map-width*)
      (let* ((tile (aref (game-map/tiles map) x y))
             (wall (tile/block-sight tile))
             (visible (tile/visible tile))
             (explored (tile/explored tile)))
        (cond (visible
               (if wall
                   (setf (blt:background-color) (getf *color-map* :light-wall))
                   (setf (blt:background-color) (getf *color-map* :light-ground)))
               (setf (blt:cell-char x y) #\Space))
              (explored
               (if wall
                   (setf (blt:background-color) (getf *color-map* :dark-wall))
                   (setf (blt:background-color) (getf *color-map* :dark-ground)))
               (setf (blt:cell-char x y) #\Space))))))
  (mapc #'(lambda (entity) (draw entity map)) entities)
  (setf (blt:background-color) (blt:black))
  (blt:refresh))
The last step we’ll want to do is to also update the entity draw method. We’ll only want to draw entities that the player can see:
(defmethod draw ((e entity) (map game-map))
  (with-slots (x y char color) e
    (if (tile/visible (aref (game-map/tiles map) x y))
        (setf
         (blt:background-color) (blt:cell-background-color x y)
         (blt:color) color
         (blt:cell-char x y) char))))
Now if you run the game, you should see something like this:

Conclusion
That’s all there is to it. If you’re interested in other more efficient algorithms, I’d recommend checking out the FOV section on RogueBasin.
You can find the current state of the code on Github. The list of changes since the previous tutorial can be found at https://github.com/nwforrer/cl-rltut/compare/part-3...part-4.
If you run into any issues, or have some feedback, please open an issue on this blogs GitHub repository.
Continue to part 5.